THE BLOG

The Ultimate Guide To Boosting Your Blogging Strategy
Looking to up your blogging game? This all-in-one guide will take you to the next level with tips and fixes including...

The Ultimate Guide To Boosting Your Blogging Strategy
Yes!
I'm finally writing about my biggest passion of the last two years (besides travel, minimalism, food, pugs, and finally, Taran): BLOGGING, to bring you 40 simple steps to making a better blog!
I believe that I was always destined to write, from a young age; I wrote anything from poetry to short stories to songs even. But when I was a teenager and trying to find my creative outlet, blogging was in its infancy. I had no idea that one day this would be my thing.
We grew up together, blogging and I.
I liked the idea of journalism, but I also always wanted to help people, provide advice or guidance, but did I have a single clue via which channel I wanted to do that? I truly didn't, until 2 years ago.
This blog is one of the best things I have ever gone through with, from its small beginnings to what it has grown into today.
I've had so many ideas about blogging advice jumping around my brain for months.
The last 2 years have been a major learning curve for me as a blogger. Even the last 2 months have brought me reams of new ideas. I now read about blogging more than I read about travel which might seem odd to admit as a travel writer.
No offence to my fellow travel bloggers! I love peoples travel chronicles and advice, but when I get downtime from travel, I use my days to hone my blogging craft.
I have slowly figured out some solid ways to boost my own blogging strategy, through trial and error, lots of time on social networks and other blogs.
Ready to totally up your blogging game and follow 40 proven steps to success?
Below is an 8 part guide, which centres on the different areas of blogging strategy.
1 - Review your blogs user friendliness
2 - Engage with other creators in your community
3 - Review your newsletter strategy
4 - Build a deep and sincere relationship with your audience
5 - Utilize social media scheduling tools
6 - Create great content upgrades
7 - Audit and repurpose old content
8 - Improving your writing

1. Review your blog's user friendliness
We often get disconnected from the user experience of our readers when we are in a routine of writing, publishing and sharing.
How often do you actually sit and use your website as if it wasn’t your own? Do you ever take a moment to actually enjoy your own stuff, whilst also critiquing it?
Use your website instinctively and intuitively.
This isn't about analysing your writing quality, that we will discuss in a part 8; this is purely about design elements, technical issues and general user-friendliness.
Write down anything which sticks out to you as needing immediate changing, from small details, to overarching flaws. Note what is working well and see if you can build on this across your site to deliver a more consistent and stream-line look.
Struggling to critique? Consider this:
Are your most recent, and most popular blog posts easy to find?
Your blog might have a deep archive filled with content that doesn't match your current style, theme or message. In time you probably intend to edit or remove these posts, but meanwhile, you want to ensure that your new readers come into easy contact with what you know is 100% current, as well as your evergreen content. We personally use a gallery tab on our homepage which shows 5 of our most read posts. We then share our most recent content nearer the bottom of that page. We also have a category in the top navigation bar for latest and popular. We basically make it super simple for anyone to find the content we want them to see first.
Are your sharing buttons well-placed for optimal visibility?
If people love what they find, at almost any place on your site, can they easily share that on multiple social networks? We favour using AddThis to display our sharing buttons on the left side of the page for desktop and at the bottom for mobile. We originally relied on social links at the top of the page, plus a floating follow widget that followed the page as you scrolled down, as well as sharing links at the bottom of the post. I have noticed a lot of popular or high-quality blogs who do this is also, only including share buttons at the very bottom of a post. I do ideally want people to read all the way through a post before sharing, but not everyone will read the whole she-bang before they feel the desire to share it. I like the placing of our buttons because they don't detract from the bulk of the text whilst also making it very easy to share the post.
Can your readers easily ascertain who you are and what you do, without having to read your 'About' page?
Something we have tried to do here at Nomad'er How Far is ensure that we use a bio on the homepage, and at the bottom of every post, using our keywords to get across our blog's purpose. We also created categories for all of our blog posts displayed along the top bar, so that readers can get a quick idea of the key things we are all about, no matter which section they land on. Our homepage uses an video in the header if you are viewing on desktop. We also have our sidebar present on every page, displaying our logo, names and social channels.
Do you use one readable font type across your site for a simpler viewing aesthetic?
We go through phases where we hate our font and want to change it, we often stumble upon a dream font somewhere online and then can't find a worthy match. For now, we are mostly a-ok with this font because we know it's readable. We did however make our font smaller, which makes our longer posts much easier to take in. We also now use our Heading 1 and Heading 2 correctly, as this has a lot to do with improving SEO; our blog title at the top of the post is always Heading 1, and any subsequent sub-titles, Heading 2. This is something we had just brushed aside until recently and is such an easy mistake to make, we genuinely felt a bit silly when we realised what we were doing.
Is your colour scheme and layout easy on the eyes?
We have used the same colour scheme since day one, although I did gently encourage Taran to lighten the background because I love black on white, whereas he thinks the pop of colour is better. It is actually good for our blog because it visually complements our logo image, and is a continuation of our branding.
Focusing on these elements of design have helped me spot a number of things that needed addressing on our site; I found that many of my blog posts weren’t using the best header images, and I also found weird glitches in fonts, where my bottom bio was all messed up. I couldn’t believe I'd missed this stuff before, but I hadn’t been looking for it.
My forever solution to this problem is to regularly audit my content. I go back through the archives, pick old posts and edit them to ensure they follow the design of our newer posts.
HOLD UP, we will discuss this more in Step 7.
2. Engage with other creators in your community
Lately I have loved being social, present and chatty across our social networks. I'm a chatter box by nature and I have to kerb this so as not to babble all the time. Like I was about to, just then… So recently I have massively upped my game across the board, from Facebook groups, to twitter conversations, to talking more to the bloggers who inspire me the most. I have also become addicted to podcasts and I now use my walk to work for lots of inspirational brainstorming time.
As bloggers we can become solitary figures, locked down to our laptops, typing away endlessly, and trying to go it alone in creating great stuff, and sharing it. But I have to remind myself that blogging is fundamentally, my hobby, so I should try and enjoy it more. Sure I get days and even weeks where I avoid everything to do with my blog, which I call, my blogging overwhelm. But right now I am striking the balance between engaging often and brightly, with my fellow bloggers, as well as creating meaty content.
I especially love talking to and sharing the stories of those who are just starting out in blogging, travel or minimalism, because we were all new to this once upon a time!
5 Things To Consider:
Do you regularly share others content, which you have read and can truly advocate?
I believe its more important to share other people's content less frequently, and focus more on the quality of what you share, furthering the message and purpose of other bloggers you personally respect. As bloggers I believe we want to encourage each other in our quest to produce truly engaging and life-changing stuff. But also, it makes sense that you don't deliver to your loyal followers something that you can't provide 3 solid reasons for why they should read it. You don't want to fill up the feeds of your fellow bloggers and your audience with things that aren't worth their precious attention. Plus, if you share absolutely anything, of any quality, it does nothing for your credibility as a voice worth listening to.
Have you created a spreadsheet to collate your favourite posts from other bloggers or websites?
This is a massive time-saver that I recently brought in, so that I can save any links I have read and shared, and make it easier to re-share them again in the future. I also utilize Pinterest and Feedly, for when I want to source new bloggers or content worth sharing; I look at my saved pins and newsfeed, and pick a few things to share on other platforms. Yet again, this saves time and carries forth a message in-line with your own, curating social spaces that are unequivocally suited to your niche or target reader.
I have also been making better use of IFTTT, which if you haven't heard of, is a neat site which allows you to connect different processes through what they call 'Recipes'. I've connected our Twitter to my google drive, so that all the tweets I post are saved into a spreadsheet; this helps make twitter sharing quicker in the future.
Are you regularly commenting on other creators posts, offering positivity and friendship?
I develop blogger and youtuber crushes constantly when I find people who are hitting it out the park with their stuff. I don't necessarily mean established and well-liked individuals, I mean people similar to myself, who are maybe not yet pro-blogging, but headed that way. This might seem like a purely social activity not geared to improving your blogs success, but it truly is.
Some of my favourite podcasters, some of whom are super successful personalities, often bring on fellow creators to share their wisdom, and these people aren't just their guests, they're their friends. When you move forward in your creative journey, it makes sense to bring others along with you, to complement one another in your different outlets, and make the long process of growth far less lonely. But also, by being massive and consistent supporters of our fellow creators, we foster mutually beneficial friendships, not short-term business connections.
Do you play an active part in Facebook communities in your niche, offering advice and opinions, not just links back to your website?
I try hard where possible to help others via the various Facebook groups I am currently in (including a minimalism group of around 7000 people), but more often than not, I am the one seeking help. I am still a relatively new blogger, and there is an awful lot that I yearn to understand. Thankfully, these communities are full of people willing to share their wisdom, open to building others up, because its the cool thing to do. We are all in this together, and whilst competition exists, there isn't ever going to be one standout winner in this game. If you are someone who wants to succeed and become the top in your field, and you choose to chase this in a selfish and one-sided manner, you're not really here for the right reasons. Sharing IS caring.
Have you reached out to any of your blogging companions via email to discuss a collaboration?
I personally struggle with this one usually because of time limitations; I'm so caught up in my daily life and blogging routine, I neglect to broaden my content variety by inviting others onto the blog or reaching out to guest post on other sites. I just never get down to writing out thoughtful emails to people who I genuinely want to collab with out of fear that they will either say no, or simply be too busy, in which case I feel bad for bothering them aha! People-pleaser disease. I am definitely going to be working on this big time in the coming months.
This idea, as well as the other 4, will benefit your blog in terms of content variety and authority, but at the core, it’s a fun and important part of staying sane in the blogging game.
We're all here to cultivate something special and real aren’t we? Being engaged and creative within the communities which we rely upon and want to be successful in, is a key part of that.
Step 3. Review your newsletter strategy
We currently use Mail-chimp, because, duh, it’s free...up to a certain point that we are nowhere near reaching.
We have seen a huge rise in our newsletter sign ups in the past 2 months. We believe this is directly linked to the addition of a call to action to join our email list, placed in the middle of our longest and best content. We don’t have a welcome mat or a pop-up (we find these mildly annoying even if they do apparently convert to list growth) but so far, increasing the opportunities to join the list across our blog posts has more than sufficed.
For the longest time we sent out a weekly newsletter pulled from our RSS feed. This is surely a pretty boring email to receive, plus these often end up in people's promotional folder, not even their main inbox. It's great for our readers who need reminding we exist, but, it doesn't provide extra value to those who have willingly handed over their email address in the hope of getting something great.
Recently we made some changes based on the fact that we suddenly had this growing audience on our email list who had signed up assuming they’d receive bonus content, and we simply were not delivering on this.
We still keep to only 1-2 emails a week, but we now bulk out the RSS email with a conversational style of email. We share more personal info that links well to recent blog posts and we try to give a little extra detail than what our audience finds on the blog.
But the biggest change has been the addition of a mid-week email. I create a relatively long-form email which will relate to a recent post, and make mention of my minimalism eBook. In-depth and thought-provoking, this email levels a question at readers in the end. The answer to that question could well lie in the product you are promoting be it free or paid, or in the very least, it makes your readers think, and interact.
You really cannot underestimate the connection you can build with your reader via email, so consider these 5 ideas:
How often do you email your list, and what are you current open rates?
We review our analytics for our open rates and click-throughs via Mail-chimp, and it's always a good way of measuring which email format is working best. But because we only alternate between an RSS-driven email, and a more long-form chatty one, there is little room for drastic comparisons. We generally use this as a rule of thumb for if we need to up our game further, for example, by creating a better email subject line in future emails.
Do you often share something valuable, and bonus, making the members of your list feel like they are part of an exclusive club?
We send emails to our small (but steadily growing list) which are more conversational to encourage more interaction than the average blog post might do. We also expand on our current posts, or discuss something relevant but not yet published on the blog. We have also brought in content upgrades only available by joining our list, but in the future we will periodically send out content upgrades to our list, as well as incorporating an opt-in to a landing page, which will be a piece of evergreen content.
Are you including a call to action at the end of your email, plus 1-2 links within the text?
Research into getting your emails not flagged as spam might suggest against too much link dropping in an email, but you should still include at least 1-2 links within the text, otherwise you are missing out on a targeted traffic-driving opportunity. I definitely keep it to a minimum however. I also add a call to action to the bottom of the email which relates to the key topic or takeaway of that email and directs readers back to my website or product.
Is your sign up link visible across your site, during your content and at the end as a call to action?
Our list growth can be directly attributed to the increased visibility of our sign up link, now included in the middle of posts, often at the end, and in the side-bar. We have seen a 1000% growth in our list. Yes, 1000%. For months we only gained 2-4 new people a month...to now getting 2-4 a day.
And you know what, we haven't used any annoying user-interrupting methods or pop-ups to achieve this growth! It is purely from having more sign-up links across our posts, combined with a couple of content upgrades in some posts, but only a couple so far.
Have you made this sign-up link enticing, but not promising of too much that you can't deliver?
We generally keep it short and simple, and we ask, 'Like What You're Reading?', so when people sign up, it's a vote for YES, your stuff is good, and I wanna hear more.
We don't promise a specific type of email as we are still in the process of improving our email content strategy and don't want to make false promises. We believe its mostly important to have a great piece of content, because then you gain list sign ups based on the quality of your writing and the message this infers, that whatever your emails contain, it will probably be good.
I know this blog post is a long read. I mean, LONGGGGGG, so I have also created a printable checklist for all 40 steps:
Sign up to our newsletter and get it sent to you instantly!
See what I did there ;)
4. Build a deep and sincere relationship with your audience
Of course your email list, your social media sharing and your actual blog posts all go a great distance in building your audience, but do they facilitate a deep and lasting connection?
Do you convert one-time visitors to long-term readers? Are you true to yourself and yet true to your audience and their needs?
42% of the world’s population now have internet access, and right now, around 3 billion people use a variety of devices to access it, but not all of whom are reading blogs (stats courtesy of we are social). That’s a lot of people all searching for inspiration and information, online. But then again, there are also 6.77 million people producing blogs.
But how many of these blogs are in your niche? And how many of them are producing content of a consistently high quality? Well, for starters, you need to be confident enough to say that you are... You need to be sure (via step 1 and later, step 8) that you are producing stuff worthy of an audience.
But really, it doesn’t matter what the numbers say, or how scary your level of competition is. You can still make a place within an over-saturated marketplace if your blog impacts a few people each and every day; you are going to gradually increase awareness, grow your audience and become a useful resource to a small but valid part of those 3 billion people.
Do you reply to comments promptly, address the commenter by name if possible, thank them, and think before you respond?
This is pretty much the most basic thing for audience engagement. We don't receive a constant stream of comments so its relatively easy for us to do this for every comment, always. I get its harder for larger blogs to keep up with but I still think its a worthwhile practise. I know you can't drop everything to immediately respond to a comment but even taking 10 minutes twice a day to do so, is still prompt enough for most people.
I really dislike it when a blogger replies to my comment with a perfunctory response that shows they speed-read my comment and probably found even that level of interaction an inconvenience. I think it all boils down to knowing your purpose; do you write for yourself, for your audience or to generate customers? For many creators, you are basically nothing without your readers, and you would be speaking to a brick wall if none of them felt like respected commenters.
Do you pepper your content with provocative questions, or statements, to make your readers think and respond?
We used to end every post with a question but it didn't really work, and maybe that's because we were focusing too much on this one question, neglecting all the points in our post that might have got our reading thinking, and wanting to speak. And it's not about asking more questions than you answer, but it is about placing a couple of well-worded sentences, which might even contest the point you are actually making. I believe we should assert our advice and be confident in it, whilst still showing a consideration for other perspectives. For example, in this post, we delivered a firm stance (albeit on a mildly trivial topic) but we still suggested ideas in support of those of the opposite stance. That brings me nicely to my next point...
Do you write about something from a fully-informed place, and use secondary sources as support?
I think its very important to not just use disclaimers (more in point 5) and refer to external sources across your blog, in places where you recommend products or specific ideas, but also, you should expand your readers knowledge on a topic, beyond the points you yourself present as truth. I make good use of social media to drive this but I also try to refer to external research in a blog post, sometimes that I myself conducted. I find this helps me to not make assumptions about the pains of my readers, or deliver unrealistic advice. Also, in certain posts when I am delivering a perspective from my own personal experience, I use my own situation to help my readers avoid the same outcomes. If we simply sound off about our own pains and basically put out negative vibes, what value does that provide others?
Are you honest and true to yourself in your creative output?
This might be hard if you cultivate a persona based on indomitable strength and success, who prefers to always keep up the appearance being an iron-clad authority in your field, and nothing else. But most of us show some level of weakness because it appeals to our audience, and because we want to keep it real. We want to be a respected authority but we don't want to steer so far away from sharing our imperfections that we lack personality and hold back our truth. This is important for building reader connections because we come across as real people, with real concerns, and the solutions to match, who care about our readers lives more than just being business-like 24/7.
I always go back to my reasoning for beginning this blog, which was to chronicle a phase of my life which I knew would be momentous. It then changed over time because I realized that I could marry my desire to be a helpful advice-giving person with my minimalist travel adventures, and maybe, just maybe, turn it into a part-time job. My fundamental goal starting out was centred around creativity, expression and honesty, something I never want to stray from in the pursuit of blogging success. My audience, every day real people (not companies), and the truthfulness of my content, is of my up-most concern. That brings me smoothly to the next point...
Is your blog over-run with self-promotion, external ad's and sponsored posts?
I talked about this topic super in-depth a little while back because it had been majorly bothering me. I get that plenty of the biggest and best blogs out there will have ad's and self-promo in abundance, and that great content can co-exist alongside these things. But for a number of reasons, this can really turn off your readers and distance you from them. I want to be drawn in and delivered something of value on the blog I have chosen to read, and I want to be offered, in small subtle ways, invitations to develop my knowledge, which may be via your affiliate, eBook or course. But I don't want to click on a link, having been tempted by a Pin or tweet, to then find a website I can barely load for all the ad's its running. I won't even read the post in this scenario, I will click off before my browser implodes (my tiny laptop is not built for much).
If you aren't striking a nice balance between furthering your professional goals, and also delivering a readable website with consistent and high-quality content, your readers will suffer, and eventually, you will to. We would love to build an income from our blog, because we're nomads and work is not a stable facet of our lives; we basically need to find a way to make a sustainable living to keep on travelling. But you know what, we currently both work casually and part-time (we often end up washing dishes or doing housekeeping) and we go without, every week, but we still pay our website fee, and we still invest all our free time into this blog. We have turned down numerous sponsored posts and limit our ad's to 2/3 sidebar spots at current, because we have a clear idea on how we want to do this blog.
Our passion costs us time and money that we don't really have, but that's love folks. Love for our audience, love for helping them, love for our creativity, and a belief in a bigger purpose to what we are doing here.
5. Utilize Social Media Scheduling Tools
So this step goes hand in hand with engaging in your communities.
Do you use an automated and efficient sharing process for your own content and that of other people?
Our favourite tools for sharing (and engaging) include Tailwind for Pinterest. We invested in the full paid version because not only is Pinterest our number one traffic source (thanks to some semi-viral minimalism pins that no longer fit our style and look kinda ugly, ha!) but it’s also my favourite place for curating and sharing content I love and can learn from.
I share some pins right away but schedule about 70% into our Tailwind queue. This means I am constantly building our boards at a rate I couldn’t without the scheduler. I also love Tailwind for the analytics as it shows the virality and engagement score for your boards and group boards. This helps us know where our tribe is most active and where we should pin to most regularly.
We use Twitter regularly to chat with fellow bloggers and know it’s where our professional circle spends a lot of time, along with Facebook communities. So I love to use Tweetdeck combined with my twitter lists. Twitter lists are actually my favourite new thing that I have been using to make the crazy nature of Twitter, easier to navigate. I find this is the easiest way to see the latest content from my favourite bloggers and quickly add it to my scheduled tweets, which I then specify to go out at a specific time and date. I try to space these out across the week, and to post early in the morning and late at night (I tweet live during the day).
I see Pinterest, Facebook and Twitter as a great way for curating content that I love, as well getting my own messages out there.
We also use Tweet Jukebox to send out a list of our key important links each week. We edit the tweets weekly as Twitter isn’t a fan of duplicate tweet content! We include things like our Patreon sign-up, our email list sign-up, YouTube channel and 2-3 of our best evergreen posts.
It’s quite obvious that if we are ever-present and providing valuable sharing, beneficial to our readers and our comrades, then we will also create more awareness for our own stuff.
But that’s not to say that the key reason for a solid sharing strategy is to ultimately lead to our own growth, but its a cluster of activity that helps elevate your brand as well as lift others up.
5 things to think about:
Are you automating and spacing out your sharing as much as you can?
Tailwind is great for this purely because everything is added to a schedule which posts your pins to nominated boards in intervals which you can specify. Also, via Twitter and Tweet-deck, I like to live tweet/re-tweet/like throughout the day and have 4-5 things pre-scheduled to go out at other times, so that I am present across the different time zones, and can build engagement in my sleep. We also schedule Facebook updates to ensure our content is seen by the time-zones that our largest demographics come from.
Do you utilize free tools as well as premium sites to help you share consistently?
We love Tailwind but its currently the only paid tool we use. We utilize all the free tools previously mentioned such as Tweetdeck and Tweet-Jukebox as well as Canva and free stock photos for our sharing designs. We are always on the look-out for new free tools because we are still a small-scale operation. But the main justification in our minds for forking out for Tailwind is because Pinterest is our biggest traffic source. If we have any intent of growing then some investment in our social tools is necessary. I believe even bigger bloggers can seek out frugality in the running costs of a blog, but realistically your social tools should reflect your audience size and how well you can manage it and grow it. Don't spend money on social tools if you can do most of the work on the free ones.
Have you looked at your Twitter/Pinterest/Facebook analytics to see if your current schedule is working?
As much as I love Twitter, it is a tiny source of traffic for us. But Twitter has a bigger purpose as we use it for building and maintaining our relationships with other bloggers as well as learning stuff from our favourites. I still have a regular sharing strategy because I know that if you have a large audience on a social network, then some of that audience will be made up of your readers. Being present in a variety of channels that your readers might want to find you is a solid idea, but, we can always play around with social strategy to ensure we balance out being engaging with our counterparts and engaging with our audience. Its important we regularly check if we are reaching certain goals via our current social activities, whatever those goals may be. When your goal is measurable, such as gaining new readers, then reviewing your analytics will help you know where to always show up. When your goal is building business relationships, then it makes sense to change the way you interact on certain platforms.
Could you alter the way you contribute to your social spaces to better meet your core goals?
One thing we have done recently is delete pins on Pinterest to make sure our boards are continually of good quality and engaging. We also like to ensure we are chatty and honest on Twitter so that our followers and fellow creators see us as more than just link generators. Furthermore, we like to do live videos on Facebook as this is a rapidly growing feature that we want to take advantage of to actually share the travel side of our blog. Basically, each social space is different and can be curated to show different sides of your blog and your personality, when used correctly.
Have you looked at expanding your reach to different social networks e.g. Stumble-upon, Google+, Snap-chat or Periscope?
We have taken a few light steps in Stumble-upon and are still none-the-wiser to Periscope so this step is advice we too need to act on. I think it's all too easy to stick to what you know works or to believe that you are already adequately reaching your audience, but you could at least experiment in these different spaces. Your audience are often trying out new social networks, so it's probably wise that you follow suit. But you can still have a strategy in mind, and look at the optimal ways to deliver value in these new spaces, not just replicate your strategy from other social networks.
Step 6. Create great content upgrades
I'm super new to this, mainly because when we were travelling non-stop (before we took a travel pause to work and save up) I had barely enough time or internet to upload a post let alone create a content upgrade.
I have tried recently to focus more on this because not only is it an incentive for email list sign-ups but it provides your audience with double the value they expected to receive. You deliver something great, and then some. That 'then some' can set you apart, or just better imprint you in the memory of your readers.
Even if I don’t always read or use the content upgrade I might find on my favourite posts from other bloggers, it is suggestive of a quality and committed creator who wants to help me as much as they can. And, they want to do it mostly for free.
5 things to consider:
Would some of your older posts which still deliver traffic benefit from an email list content upgrade?
I am currently in the process of creating some content upgrades for older posts, be they just a downloadable PDF (which requires email sign-up) or an activity workbook, but for me, its a slow process. The best way to go about this might be to review your top-performing posts and see if they might also convert readers to email sign-ups. Do these posts max out on value or could value be added with an upgrade?
Are your current content upgrades converting in some way, and if not, how could you make them better?
We recently published a post in our super popular minimalism section which included a content upgrade. It has resulted in a few email sign-ups but not a whole lot. I think the best way to overcome this is to give the post some time to grow its audience (being that is reasonably new) and see over time if it converts to sign-ups. But if it doesn't convert we will probably adjust the sign-up link text to make it more enticing. We might look at the placing of the sign-up and ensure that it will be seen as a highly relevant solution to the problem discussed in that part of the post.
Have you isolated the best content for upgrades or do you place them across all your postings?
It might seem that placing upgrades on all your posts or just the ones which get the most views is the way to go, but those posts might not actually be suited to an upgrade. I think its probably wiser to spend time on one amazing upgrade that is completely useful within a given post, even if it isn't a highly popular post. This is a great way of improving an older post and driving new traffic to it, meaning that when you go to re-share it on social media you can make mention of the new awesome content upgrade.
Are your content upgrades actually good and something you yourself would want to download?
Taking on the challenge of bringing in content upgrades can add a lot of stress but not necessarily a lot of value. If you allocate a lot of time to develop your upgrades, and want it to build your audience engagement significantly, you want your sign-ups to receive something they will be more than satisfied with. Focus less on developing multiple upgrades for multiple posts and instead, build occasional upgrades which are extremely in-depth and useful. It takes a lot of time and energy to construct a blog post that people will love and share, so it makes sense to not try and add to this commitment by creating too many sub-par upgrades.
Have you considered creating one great upgrade applicable to more than one blog post or topic?
I currently publicize my eBook as a great supplement to my minimalism posts but of course anyone can buy this, they don't need to sign up to my email list to get it. But, you could introduce some short-term incentives for existing products in your inventory, by creating a discount on a paid product, only available via your email sign-up. You could then insert this into relevant posts, see how it performs and adjust it accordingly. If you want to create new products, be it a free eBook or course for example, then these should be something solidly relevant across your whole site.
Providing discount incentive sign-ups on paid products might seem like a bit of a pushy and salesy thing to do, but people can take the offer, or leave it. If you put lots of effort into creating a brilliant product worth buying, which you want to generate passive income on, then a content upgrade will help you do so; you already did a lot of hard work to create your product, make sure you give it the best chance to succeed.

Step 7. Audit and repurpose old content
Those of us that have been in the blogging lark a while are probably regularly auditing our websites, reviewing our traffic, SEO, keywords, meta data and imagery, then making slight improvements to our content along the way.
It’s something I have been majorly lacking on recently; being engaging and social leaves little time for this which I find quite a daunting task. Having produced our blog for over 2 years, there are a lot of pages and posts to audit and edit. There are some things I know desperately need fixing, some I am too afraid to look at, and then others I know could really boost our blog if updated.
The benefit of a blog audit is to know where you are at, how your blog is performing across the board and thus establish where you need to change things. When an audit is combined with repurposing, you can create new content from what you already have, potentially boosting your traffic and improving your brand cohesiveness. Many of your best blog posts will have been buried somewhere down the line, unless they have taken on a viral life of their own. And so many could do with updating to ensure any new visitors land on content that is totally in-line with your current keywords, voice, visuals and of course, your email list sign ups and content upgrades.
In part 1 we used our blog as if we were a reader. We may have isolated different things we needed to immediately change or edit. But within part 7, we can now set aside time to audit, edit and repurpose, one post at a time, one day at a time.
5 ideas to think about:
Are your recent and popular posts the best they can be, in terms of spelling, grammar, layout, visuals, social sharing imagery and of course, calls to action?
We always make sure to review each week which of our most recent and popular posts are gaining the highest traffic, and we proceed to re-read them, edit and ensure that we didn't miss anything when we originally published them. There's nothing worse than a new post gaining great virality, and only then do you realize it isn't the optimal representation of your best creative practise. We combat this by re-reading a post when we go to share it, be it 1, 2 or 3 weeks later.
Have you got old content with great potential but which needs a total revamp?
We most recently altered a super old post which was garnering fresh activity on Pinterest. The post itself is 2 years old, and highly simplistic compared to more recent posts on the same subject. Instead of removing it or changing it drastically, I made sure it was grammatically correct, created a new pin and matching header image, and added a comment at the top inviting people to read our more recent and in-depth posts on the same topic. I basically invited people to the stuff I would prefer they read, which is broadly better, but the post itself still holds some value, so I of course encouraged readers to continue. This post then saw a surge in traffic even though I didn't re-share it in all its up-to-date glory. It most importantly lead readers to the rest of our content on the topic, simply by adding the new opening sentence.
Many of our older or original blog posts lack several things we now include as standard. They don't simply look weird and wrong but they are either extremely short and basic, or just not in line with our current style of delivery. But if we took the time to write on this topic way back when, surely we cared about the idea or thought it was worth discussing. So part of our current auditing process is to pick things from deep in archives, which probably get no reads at current, and completely revamp them, change the publishing date and re-share.
Are you categorizing all your posts clearly meaning people can easily find your different content, not simply your most popular or latest posts?
Of course its important to always re-emphasize your latest creations and direct people to your most popular stuff, because, well, we know there's a high chance they will like it. But we should also make sure that our readers can actually get into our archives and can easily read further into a specific topic if we have talked about it numerous times.
We make sure we have a search bar in our side-bar so people can look up anything on our site. We also have our posts categorized which then display along the top-bar. This helps readers spend more time on the site, which of course builds a deeper connection and helps elevate your brand over time. We are not the sum of only our best offerings, or only appealing and worth reading based on our most recent stuff. Our blogs grow and develop over time, and some people want the chance to experience that, know us on a deeper level and extract value across all our creations.
Do you link to older or similar posts in several places, also including a list at the end of each post for relevant suggested reading?
I don't do this enough, but somewhere I recently implemented this, was on our 'Start Here' page. Instead of just talking about our topics, I straight away list 5 useful posts that people should read, which takes them through our blog purpose and ethos. Our tag-line states that we changed our spending habits, embraced minimalism, ditched the 9-5 and started afresh, so we list 5 posts which help our readers do the same. We also list relevant internal and external links to posts which expand on the given topic (or one particular point within the post). Sometimes one post is highly relevant to another but slightly different in topic matter, but by linking to a relevant read, you are making yourself appear like a bottomless pit of interesting info.
I feel like people are more responsive to a bulleted list of links, titled by what that blog post is about, not simply peppered through as in-text links, because they can sometimes get lost in the process of reading. I have admittedly used in-text links in this post purely because this is a super long read with those links only supplemental to the actual points.
Have you looked at repurposing certain pieces which might work better in video, audio or infographic form?
Blog post repurposing and auditing can go hand-in-hand I believe. If you find a post that could work better or could engage a different audience via another form, then consider why and how. Don't try to convert a blog post into another format just because you can, try to locate things which can be expanded on or explained better in video, audio or infographic form. There are many ideas on what you can repurpose your stuff into, with Darren at Pro-blogger and Melyssa Griffin offering great advice on this tactic.
Step 8. Improving your writing
After all that's said and done, you have looked at the ways you can improve website user friendliness, engage more with fellow creators, refine your newsletter, build a deeper relationship with your audience, simplify your social sharing, devise great content upgrades and improve old blog posts.
You want to boost your blogging strategy, up your game, and just get better at what you love to do, via these proven methods for success.
You've ticked many a box, but this step pales the others in comparison.
If you don't have great writing, you have nothing. Well, you have something, just not something worthy of you or your audience. But you do have something you can build up, change and improve.
No matter what in the blogging game, you can always improve!
I am constantly working on all the other steps but I realized recently that I don't spend enough time educating myself on how to write really, really, well. One thing which got me thinking more deeply about this was a free email course I joined a few weeks back. 'Unboring Your Writing' from Rosie Morley at Hedera House, and its been a great experience for me. I'm sure there are plenty of courses out there and I'm eager to find them too.
Rosie's course got me thinking about my writing beyond the actual story; she got me thinking about the active voice, expletive constructions and contractions, in ways I never had before. I recommend it for anyone who wants to give their writing some real attention.
When forming a blog post, do you edit as you write or let your thoughts flow without a pause?
I recently began brain dumping, something I read about when seeking some blogging inspiration. Basically, you write non-stop, letting everything come out in its organic state, without editing yourself in the process. This seriously helped me with the major blogging block I was having, but it also went against my normal mindful way of writing. I would usually go slower, editing each word even before I had wrote it down, which I now realize works well some of the time. However when it feels right, letting yourself go with the flow, tumbling out your words, and altering it later on, helps bring forth some real gems. If we over-edit ourselves during the writing process we might stunt our creativity and suck the soul from our writing.
Beyond your grammar and spelling, do you structure your sentences to be concise and clear?
I have been known to write crazily long sentences, full of words that don't need to be there. This was a major criticism of my work during my Uni studies, and I think it will always be an issue. But, by spending a bit more time during my writing and editing process, I have learned to craft my sentences better. I now include a mixture of shorter and longer sentences, made easier to read with the right punctuation placement. I have also learned to space my paragraphs to make certain points more impactful. I have also placed more focus on ensuring I don't repeat myself too much and focus on having multiple valid sentences that all have a good reason to be there.
During the editing process, how often and for how long do you re-read your post?
If you stare at one particular word long enough, it starts to look strange. The truth can be said of blogging, that if you read through your own block of content repeatedly without taking a break, it starts to not make sense. You also might fail to spot key errors or notice areas you could expand on or refine. When I finish a blog post, I leave it alone for an hour, or even a day, and then return to it. If any new ideas have come to mind in that time, I will make room for them. I will re-read my post and of course check for grammar and spelling, but also make sure I have said all I truly can. I don't want to press publish and realize 5 days later than I skimmed over certain vital points because I was rushing.
Are you getting across your natural personality and language, tweaking it for a broader reach?
I am generally someone who likes to laugh, to try and be funny, and to wax lyrical. I try to combine all this to create content with personality and value but I don't want to over exaggerate my natural traits and alienate readers. I do this by peppering my post openings with small personal details, delivered in a concise yet conversational manner; I get to the point of the blog post quickly but not without first setting the scene and clearly communicating my vibe and tone. I couldn't write any other way because I am unapologetically me, but I'm not so silly as to think that I can be myself to the nth degree. If you are writing to help, guide and inform a broad sect of people, you have to speak in a way that makes people want to listen.
Do you regularly use a set of specific words to bolster your branding whilst also expanding your vocabulary?
In Rosie's email course, she mentions that we should use certain words or phrases recurrently which helps to define our style and branding. I try to employ certain terms consistently in this manner, but I also like to shake things up by expanding on the descriptive terms I might use, especially in my travel-related stories. This creates a nice balance of language that is predictably 'my style', combined with something fresh, clever and interesting, for myself, and my readers.
If you want to truly up your blogging game, you should want to expand on your knowledge and language, so you can craft better stories that people will want to read, love and share.
New to blogging and digital marketing? We were new once too!
Today, we have 20,000 social followers, average 30,000 monthly page views and have worked with numerous bloggers and companies. We feel pretty darn accomplished!
So let us use our diverse range of experience to help you find your online feet today:

Don't forget to get your FREE PRINTABLE CHECKLIST!

Thanks for reading!
Hannah and Taran here. We hail from Southern England, where we met online and are now realizing our mutual passion for travel here at Nomad'erHowFar. We discuss Nomadic Living, Simplifying your Life and Long-term Travel, to empower, motivate and inspire our readers. Get to know us here!
Be social and come follow us across the virtual world!
LATEST POSTS


Create A Quality Cover Letter That Gets A Response
The first thing your employer is going to see when you apply for a job is the cover letter, so it better be good!

Create A Quality Cover Letter That Gets A Response.
So this master-class is gonna come at you in three parts.
If you can't be bothered to wait around for part 2 and 3, 'Creating a CV/Resume that Sticks Out From The Rest' and 'Being Interview and Job-Ready', just head over to my Fiverr, where I can help you out with a resume AND a cover letter one-on-one for only $5!!!
Alternatively, join the email list and you will receive notice when these posts are live.
I might even send ya some bonus stuff like a printable cover letter checklist or PDF for your future reference, because I am nice and spontaneous that way...
I am writing this from the perspective of a traveller working in a travellers job market. But this advice could be useful to anyone seeking assistance in getting to that all-important interview.
So, you've seen an ad online for a job you like the sound of. You jump at the chance to reply to the email address. You fall over yourself in a rush to type out something quickly because you reallllly like the sound of this job and you just know that you are perfect for it.
Well, you might just be, but the employer doesn't know this.
Stop, read the ad again, and consider might it be worth a little more thinking time before you hammer out your cover letter or inquiry email. You might have zero clue where to begin in crafting an email that sticks out amidst the 100's of others clogging up the employers inbox.
This master-class suggests a simple method to use when you face this clueless yet exciting mess of enthusiasm, and need to channel it carefully to secure a result.
I know a well-thought-out cover letter, can get results, because using this layout and formula helped me secure a job, literally within a day. I had tried numerous cover letter styles previously and all were either too long or irrelevant, and thus failed to get my message across quickly and clearly. This cover letter got a phone call a few hours later, an interview the next day, and then a job. I'm not saying it was simply the cover letter that did it, but being the thing that the employer reads first, the impression it gives sets off the rest of events that can result eventually, in a job.
Some employers will focus mostly on the resume, ensuring the person matches the skills or at least displays potential. But still, it can be a pretty solid life-skill to be able to compile a cover letter that will set you apart from the competition, to make you a triple cover letter/resume/interview threat.
The Cover Letter Email That Got Me An Interview:
Why Did This Work?
- Its short, succinct yet detailed. I introduce myself quickly in the opening sentence, and describe my work experience right away.
It also suggests that in my previous job I surpassed the basics of the job role by training my colleagues.
Showing that you might be even over-skilled for the role, infers you will meet the basic requirements but also have high standards and take a lot of pride in your work. This is what might set you apart even further.
It rounds off with some food for thought; this individual can back up their skills with referees, so they're resume will be worth a look.
I attached my resume to the email which contained all the evidence to back-up my claims and provided the reference contact details. It also contained my phone number but I evidently forgot to include this in the email sign-off, which I do recommend doing.
So a Cover Letter is important because...
You need to tick boxes to even have your resume read these days. Your cover letter should deliver the important info up-front, making the employers life a helluva lot easier. The resume will expand on all the boring other info, the cover letter sells you much faster.
So, you want to know how to craft a perfect cover letter/email that gets a reply? No worries, I can show you how.
1. READ THE AD AND NOTE THE 4 W'S:
Who is the employer/business/ contact name, What skills does the suitable candidate need and what responsibilities will they have ,When is the role due to start, and Where is the job located.
2. BEGIN YOUR EMAIL/LETTER WITH A SHORT INTRO:
Address to the Who, introduce yourself by your full name, age and location (where are you based currently or where are you moving to, dependant on whether the job is far away or local).
3. DESCRIBE YOURSELF IN THE TERMS THE AD USED:
With this opening sentence include a line about how you are well-suited to the role based on recent/previous experience.
For example, if the ad title was 'Hospitality Professional' then you'd say 'I am an experienced hospitality professional', providing that you are applying for a job you do have experience in.
If you can't describe yourself exactly in the terms of the job title, describe yourself using other terms found in the ad.
If the employer emphasizes that they want people with certain skill-sets, and you can truthfully describe yourself as containing related skills or experience, then do so.
4. OUTLINE HOW YOU MEET THE WHAT:
What have you actually done that makes you well-suited to the role. If you haven't yet done that said role, draw on your related experience and transferable skills. For example, someone who may worked in a certain setting, e.g. a hotel or a restaurant, and is applying for a front-of-house host, but previously worked as a waiter, is still going to be familiar with the inner-workings of such a business.
Don't make mildly tenuous links e.g. if you worked at McDonalds you might not quite be ready for the role of cook in a major restaurant. But then again, being familiar with how certain environments run, is still going to help you appear somewhat suited if not totally suited.
Be realistic in how your transferable skills translate over to the job role. If you try to stretch the definitions that the ad put forward for what it needs, you may get discounted right off-the-bat because you will simply seem in-experienced.
Focus on your most relevant skills, not the random or most interesting ones. Demonstrating relevant and inter-linked skills makes the employers job easier; he can size you up quickly and assess how much training you might or might not need.
5. DON'T JUST MEET THEIR NEEDS, STATE HOW THE JOB MEETS YOURS:
A short sentence, with not too much exaggerated language, outlining why you want the job so much, can help your case and differentiate you from the rest.
When people send out cover emails or letters every day, not really caring which job they get because they are just spamming every ad they see, they can become a bit re-miss in this aspect.
Ask yourself what appeals about the job role, the business or the type of responsibilities.
Does your personality mesh well with the type of environment, e.g. an energetic person who thrives in a loud and busy workplace. Can you thus represent yourself as even more suited to the role by outlining, briefly, just why this particular job role appeals to your other strengths and interests.
A satisfied worker who chooses a job based on how well it suits them naturally, will be a harder worker. A harder worker will be a respected worker. A respected worker will stick around awhile and make the employers life a lot easier.
Examples on how to use these ideas:
So, let's put this into practice. We are going to do a little exercise.
I have looked online for a few job-ads and I am going to create what I believe would be a memorable cover letter than will get the resume read, the phone call made and the interview secured.
The cover letter will alter slightly in style based on each ad. I have chosen 2 ad's for their differences to prepare you for the different ad styles you might encounter.
I used gumtree.au, a popular site in Australia where people can find everything from sofa's to boats to, you guessed it, jobs. I also used another popular Australian job-site, Seek.com.au.
Bear in mind that often the right move may be to telephone the number provided in the ad right away. Some ads will even advise to call and email, others will say only contact via email. If the case is that they want you to call and email, or just call, sometimes its good to send a cover email and resume through just before making a phone call. That way you can tell the person over the phone that in your keenness you already whizzed them off all the info they need to read.
1.

So this is the typically short ad you will often find on gumtree. Its usually because the job is simple, self-explanatory, and the job is expected to go quickly due to this. Still, a decent covering email can help with what appears a simple job application.
THE COVERING EMAIL:
Afternoon [insert name],
My names [name], I am 25, and I am a locally-based experienced waitress and barista.
I have previously worked in a commercial kitchen, taking orders, then delivering them to the kitchen, then taking the meals out when ready. I also took coffee orders, and successfully used a full coffee-machine to make a full range of normal coffee's and iced drinks, single-handedly.
I thrive in a fast-paced environment, having worked at a busy cafe on the most popular family resort on Fraser Island, and will bring an energetic and friendly mentality to the team.
I look forward to speaking further regarding this role, and can be contacted on [number] to chat.
I attach my resume for your reading.
Many thanks,
[name]
So I have kept this covering email relatively short seeing as the ad was short, however I got a lot of relevant info into the email. In this scenario I would have then telephoned the person, informed them of the sent email and had a conversation about the role.
2.
So this Ad is a little bit more meaty, and gives you much more material to be creative with in your covering letter. This ad was on Seek which requires you to attach a covering letter by uploading a word document, or you can write one out in the box provided for each job when you apply.
THE COVERING LETTER:
Aena shekhikhi!
Yes, I am fluent in Dothraki and my sense of humour is renowned across the seven kingdoms.
But am I king material? Well, I am considered a bit of a sales superstar by my previous employers, [employer name/business], delivering consistent sales meeting daily set targets often [outline any figures of sales met]. I worked within the sports industry also, and being personally incredibly fitness-oriented, I thrive in an environment where I can talk about it passionately with potential clients.
I love being part of the sales environment, where personality and outlook is key, with a presentable appearance and a fun yet professional approach also important. I get to be my usual enthusiastic self, but translate that into a rewarding career also.
I love to travel, being a traveller from the UK, it's important for me to not just experience Australia but also learn from the best in its marketing industry, build on my sales skills and take my knowledge to the next level.
I am available for interview immediately, and can't wait to get started.
Thank you,
[name].
This was personally, a challenge, because the ad makes references to Game of Thrones, which I know NOTHING about, other than that its super popular and that I can't be bothered to watch it and hide from spoilers my whole life (I already do that with Walking Dead). Anyway, I thought this was a good example for where you have to demonstrate that you have read the ad thoroughly and responded accordingly. I didn't introduce myself by name or age, because they will see this in the application and the attached resume, but I did sign off with my name.
In this letter you are demonstrating the sense of humour they require, not simply saying that you have one. You are also showing previous experience in a similar role, where you excelled, which makes you job-ready but also suggests that you are self-confident and good at dealing with customers face-to-face. But in this scenario, if you didn't have sales experience, your best bet would be to think of the ways all your current experience lends itself to the skills listed under 'What our clients are looking for'.
You essentially pepper the covering letter with some references to Game of Thrones, just like the ad did, but you don't over-do it. You get to the heart of the matter, show your experience, and show your ambition as well as your personality.
So there we go, two very different examples, but also the common types of job ad's you might come across as a working traveller.
KEY THINGS TO TAKEAWAY:
- Your covering letter whilst heavily built on the language in the ad, shouldn't look like a copy and paste job. You need to contextualize their language by relating it to your own experience and skills.
- Match the length of your cover letter to the ad, and then add a few lines. If the letters too short it might not grab the interest strongly enough (bearing in mind all your competitors) but if its too long they may lose interest. As long as you cover the key ideas they talk about in the ad, with a bit of explanation, you can't go too wrong on length decision.
- A great covering letter should only suggest things that the resume or interview can back-up. Your resume will be a jumble of information only really useful for the few keywords that jump out at the employer, so the covering letter might be the main thing they read thoroughly and thus remember, so its important to be honest and truthful.
MORE GREAT READS FOR TRAVELLERS:

Thanks for reading!
Hannah here, one half of NomaderHowFar. I love reading, the beach, proper fish and chips, and a good cup of tea. But I mostly like to chat about minimalism, simplifying your life, the beauty of travel and sometimes I get a bit deep. Get to know us here!
Be social and come follow us across the virtual world!
WANT MORE?!

How To Capture Epic Photographs
Want to learn how to use the MANUAL mode on a camera and take amazing photographs? This masterclass will teach you how...

How To Capture Epic Photographs
Since setting out on our adventure we have witnessed some wonderful sights, sights that just cried out to be snapped! We travelled for 7 months just taking photos on our GoPro and phones.. But then we forked out and bought ourselves a Canon G16. Its a fairly mid range camera with no external lens, but we did our research and the picture quality this camera can give really speaks for itself:
This was a truly beautiful moment for us, waking up at sunrise and meeting kangaroos on a beach in Australia. And the new camera certainly proved its worth! "But how did you get such a picture" You may ask.. For the above photo I set a ISO-80 and f/2.8 and then chose a fairly quick shutter speed of 1/320.
Okay so some of you may have absolutely no idea what I'm talking about.. These are the things your camera will take care of when you have it set to AUTO mode, and while this will work most of the time, you will find that you can create photographs that are way more epic on MANUAL mode. Okay so lets take a quick course on the values and what they mean, and trust me, they aren't that scary when you get your head around them :P Lets start with the thing that took me the longest to figure out..
The F-Stop Value
The f-stop value refers to the size of the cameras pupil, in many senses it works the same way your eyes pupil does. A low value of f/1.8 will mean that the pupil opens up wide and lets in the most light, and you guessed it.. a high value of say f/8 will reduce the pupils size and let in less light. Below is a little graphic to help you understand:

But this is not the only thing affected by the value.. Low value f numbers will have a lower depth of field, meaning you can take those close up pictures with blurred backgrounds. Similarly high f numbers will produce an image that will have close and distant objects in focus.
So to summarise:
LOW F VALUE (f/1.8 or similar) = MORE LIGHT + MORE BLUR
HIGH F VALUE (f/8 or similar) = LESS LIGHT + LESS BLUR
The ISO Value
ISO numbers are basically a measure of how sensitive the camera is to light, low ISO numbers mean the camera will be less sensitive and high numbers make it more sensitive. This can be very handy when taking pictures at night or inside as it will allow you to keep a fast enough shutter speed to stop there being any blur.
But this added sensitivity comes with a drawback, the higher you set the ISO the less quality you will get in your pictures, generally when taking photos outside you will want to keep the ISO as low as possible as there should be enough natural light to keep the camera happy :] Here is a comparison of two photos but to be fair the low ISO side came out brighter just because the sun was shining straight through the window...
To summarise:
LOW ISO VALUE (ISO-80 or similar) = LESS LIGHT + MORE QUALITY
HIGH ISO VALUE (ISO-3200 or similar) = MORE LIGHT + LESS QUALITY
Like what you're reading?
Sign up to our newsletter for more great tips!
And Finally, Shutter Speed
Okay, so finally we have shutter speed, I've saved the easiest till last. Shutter speed refers to how long you want to open the shutter for when you press the capture button. Opening the shutter for a very short amount of time will let in only a tiny amount of light so you will need to turn up the ISO, but you will be able to capture shots of fast moving objects without blur. Our Canon G16's quickest capture setting is 1/4000 of a second.. which is kind of ridiculous for most photography unless maybe your trying to capture a speeding bullet or something :P
On the other hand opening the shutter for longer will (you guessed it!) allow more light in. This can be very handy if you taking pictures in a dark room or at night, but you will need a tripod to keep your camera very still or the image will be blurry. This photo below was taken with the shutter open for 30 seconds in a area of low light pollution:
And so to summarise:
LOW SHUTTER SPEED (1/400 or similar) = LESS LIGHT + MOVING OBJECTS WONT BLUR
HIGH SHUTTER SPEED (30 seconds or similar) = MORE LIGHT + MOVING OBJECTS WILL BLUR
Now lets move onto the less technical skills, starting with: Focus
Sometimes there will be something that just stands out to you in the foreground of a scene, the best way to bring attention to it is to shift the focus to it! If you get a little bit further away from the object and then zoom on it you can get a good balance on the background being blurred.
Framing And Foreground Objects
A natural frame for your picture can draw your viewers eye to what you wanted them to see in the picture, as you can see above I have used part of a tree as a frame here and it doesn't overpower the image. Also the addition of a figure in the water completes a triangle of interest between the big leaf, the sun breaking through the clouds and the figure, this keeps the viewer looking for longer.
Combining Those Skills!
The above photograph was taken just after a sunset at the waters edge, I set the f value to f/8 so that the clouds and the tree where in focus. The ISO value was turned all the way down to ISO-80 to let in the least amount of light, as I was aiming at the area that the sun was still lighting up. I then let the shutter open for 15 seconds, which was needed to let some light in with the other settings, but it also gave the water an awesome effect that makes it look like mist!
Experiment!
Capturing lightning can be a tiresome thing to do.. It includes a lot of waiting around and hoping you have the camera pointing in the right direction! The picture above was taken on our GoPro silver, this was good because the wide angle lens makes it much easier to get a whole lightning bolt in the frame.
I found the easiest method was to set up the camera with the lowest settings possible on the GoPro, ISO-100 and that's all you get to change haha! Then mount it on a tripod, point it in the general direction of the lightning and turn on the time-lapse mode with the shutter speed set to 20 seconds. This way you don't have to keep pressing the capture button, you can leave it doing its thing for 30 minutes and then take a look at the results!
The Milky Way
Photographing the stars is one of my favourite things to do! To capture something like this you will need to set up your camera on a tripod preferably, I then used the settings ISO-800, f/1.8 and took a 15 second exposure. You will probably want to open the photo up in an editing program to do a few touch ups to bring the colour out and adjust the contrast (this ain't cheating by the way, no one ever gets pro Milky Way shots straight off the camera).
The above photo was compiled on the camera! The Canon G16 has a feature which does all the technical stuff for you, And gives great star trail results :P But there are some great free applications out there that will basically do the same! StarTrails.de is one example.
Any Questions? Just Ask In The Comments..
Thanks for taking this short master-class! There are a few links to the cameras and tools I used to get these photos and if you click these to purchase anything, you will be helping to keep our site running at no extra cost to you :D
Now check out our first year of travel in 12 stunning photographs.

Thanks for reading!
Taran here, owner of Nomad'er How Far. I'm fond of psychedelic rock, photography & videography, anything to do with space and I'm also partial to the odd gaming session. Oh and I love to travel :P Get to know me here!
Read More:


How To Use Canva: Simple Guide To Creating Blog Graphics
Canva is a great free design tool, and there are so many cool ways to use it as a blogger..
How to use Canva: Simple guide to creating blog graphics.
Canva is such an awesome tool for bloggers. It makes me feel like I can create really cool graphics despite being a design-challenged person...
This guide will help those who have never used canva, or who are new to it and just want a walk-through.
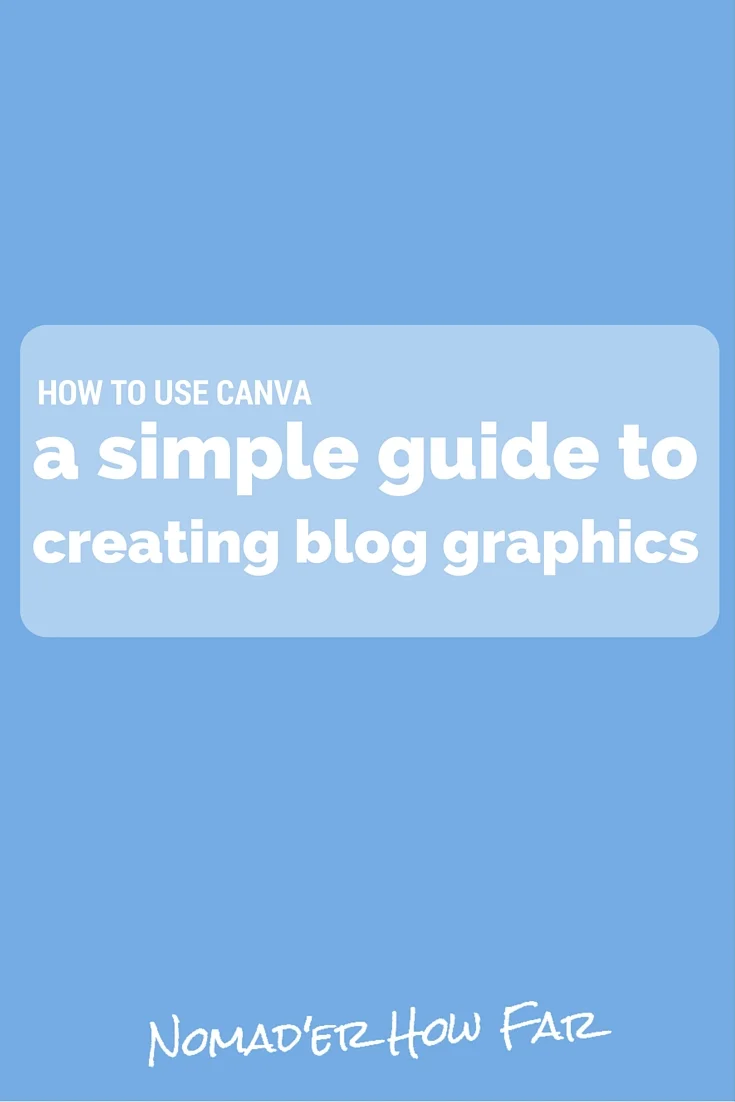
Here are a few examples:
First things first, head over to canva.

You will need to set-up an account. You could log in via your facebook but I created an account linked to my email address.
After signing up/logging in, you find yourself on a page which will show your designs (once you begin creating them).

1. Template
Along the top you can see a small sample of the many templates you can design from on canva. If you press MORE you can see the full range. On this guide we are going to create a Pinterest canva, one the most common things any blogger might create who wants to make a splash on Pinterest.
PRO TIP: High quality images, or simple colours, used as the canva background, with a short, readable textual overlay, are generally the most successful pin types which get the most re-pins and appreciation on Pinterest.
You will find the pinterest template by clicking MORE and you will find it in SOCIAL MEDIA POSTS.

This will open your blank design in a seperate window.

2. Colours
On the left-hand bar you will see already created template designs under LAYOUTS. I selected one to demonstrate. There a few good free options but also some paid. You can choose one and then edit the colours/fonts to your liking. I am going to head to the BACKGROUND tab on the left though, and use a block colour background as opposed to a pre-set design.
You can use an image of your own choice, by clicking UPLOADS or use the stock photography (some free, some cheap) on canva by clicking ELEMENTS, and then PHOTOS.

I chose the colour blue just as its heavily associated with Canva. I then adjusted the colour making it lighter. You can change the entire colour by clicking on the design, and then the circle showing the current colour. You could also use the pre-set free background styles on offer on the left.
Next, you're going to want to add text.
3. Text
To do so select TEXT on the left. A number of pre-set designs appear, but just above that is the option to add a large heading, a sub-heading and some text body. I have decided to use a pre-set text design, which is free.


I have selected the different text bits, and altered the text. There are two separate text boxes, as you can see the fonts are in two different sizes as part of the design. To alter them individually you click on each one to bring up the editing box, where you can change colour, size, font, and text content.
4. Style
I often like to add a shape to my pinterest designs, which I find in the ELEMENTS tab under SHAPES. I then edit the added shape, lower it in transparency, maybe alter the colour, and click BACK to create a nice boxed shaped background for the text box.
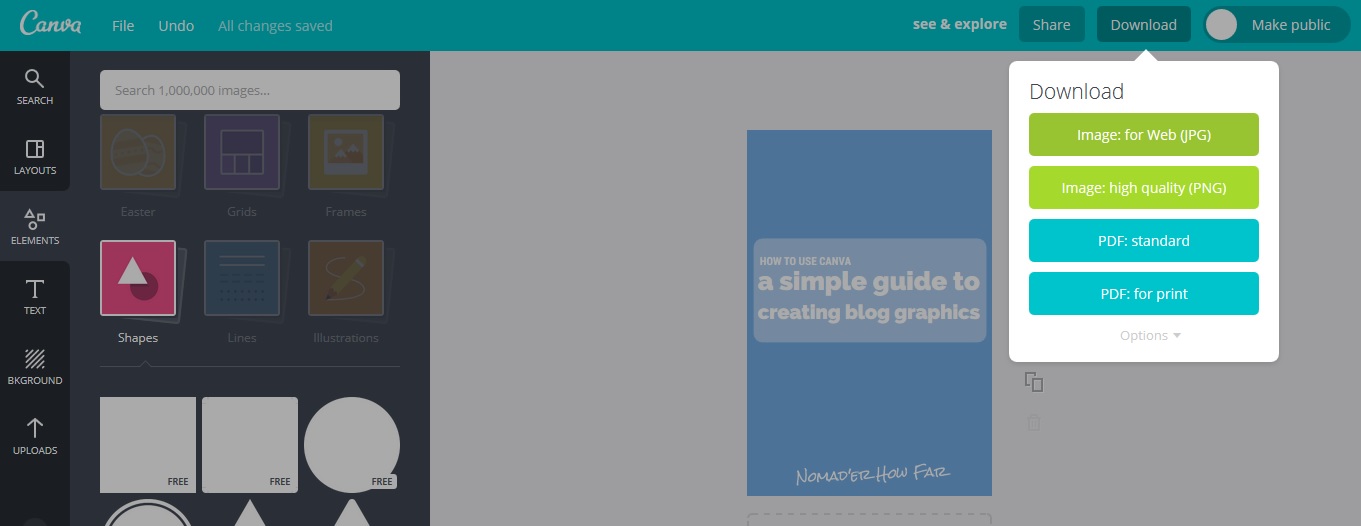
When I am happy with the design I will give it a title (where it says SEE AND EXPLORE) and then download it, clicking on image: for web (JPG). It might pop up asking if you want to save the file etc, and you can then choose where to save it. Or it may just download to your computers download folder automatically.
When you then want to use it on Pinterest it is already in the correct and most desirable dimensions.
There are so many other things you can create on canva. We also created our resume's on there. And for the blog, we create our website thumbnails, as well as youtube thumbnails, twitter graphics and facebook header images!

A Few More Tips For Using Canva:
You can use your existing designs again, if you want to use the same template but just edit some details, by heading to YOUR DESIGNS, finding the canva you want, and clicking on the arrow in the right-hand top corner, and selecting COPY.
You can upload your own logo, or watermark, to add some personal branding to a canva, by just uploading it to your photos where it will stay for all future canva creations.
You can adjust the filter on the background images you use, by just clicking FILTERS on the editing box after you put the image onto your canva. Especially useful here is adjusting the brightness and saturation if you want to bring out your text overlay more strongly.

Thanks for reading!
Hannah and Taran here. We hail from Southern England, where we met online and are now realizing our mutual passion for travel here at NomaderHowFar. We discuss Nomadic Living, Simplifying your Life and Long-term Travel, to empower, motivate and inspire our readers. Get to know us here!
Want More?!

Capturing Incredible Photographs On A Gopro - How To
The thing that has allowed us to share our adventure through some amazing pictures and videos is our beloved GoPro Hero 4 Silver.

Capturing Incredible Photographs On A Gopro - How To
The thing that has allowed me to share my adventure through some amazing pictures and videos is my beloved little GoPro Hero 4 silver.
That, and a tripod. I use a GorillaPod as it allows me to place the camera almost anywhere! It can be attached to the side of trees, placed on uneven rocks or even hold itself upside down if needed.
This photo was taken at a beach just after sunset down by the waters edge, using long exposure and low ISO settings.
A few things to understand for anyone who isn't sure:
- The ISO settings will allow you to control how sensitive your camera is to light. Basically the lower the number the less sensitive to light your camera is.
- The Exposure time will allow you to set how long your camera lets in light for, so for instance, photos of the stars and the Milky Way will need lots of light and normally require exposure times of around 30 seconds.
To take an awe-inspiring photo like our one above you will want to set your GoPro (or other suitable camera) on your mount at the water's edge and apply the following settings..
Exposure time: 30 seconds
ISO level: 100
White balance: Native
- You will only have a short window of time to take the pictures (about 10-15 mins) so make sure you are ready!
- Make sure you take a few pictures during the sunset while the light is fading. If the pictures come out too light just wait a few more minutes for it to get a tad darker.
- Import them onto your computer and apply a Black and White filter to add some impact and drama to your snaps!
When it comes to taking pictures of the Milky Way, things can be a little bit harder..
For starters you will need to be somewhere with low light pollution otherwise you will just pick up all the light from surrounding cities in your picture. LightPollutionMap is a great website that allows you to find areas with low light pollution, once you have found your spot and it's not a cloudy night, set your camera up on its tripod and use the following settings:
Exposure time: 30 seconds (or above if possible)
ISO level: 800
White balance: Native
- Point the GoPro in the direction of the Milky Way. It has a very wide field of view with its fisheye lens so there is little chance that you will miss things as long as you point the camera in the general direction!
- After importing to your computer you will want to play around with the photo for a while on a editing program, increasing the contrast and altering the saturation will bring out the colours of the milky way and really give it some omph!
- From what I have found the photo's come out better if you allow some foreground objects into the picture as well, a few trees will do the trick.
Ready for some more advanced tips? Check out this new updated article:

Wanna know how to take EPIC photographs?! Check out our short master-class :D https://t.co/hnrcpxCttB pic.twitter.com/GIUbpbpFX7
— Nomad'er How Far (@Nomaderhowfar) April 2, 2016
Now lets see what the video side of a GoPro can do! Here's what ours has seen while in Australia:
These are photo's I will always treasure, and always look back on in disbelief that I was able to take them. With a little practice and time, you too can be your own master of your camera, and creator of a stunning collection of photographic moments.


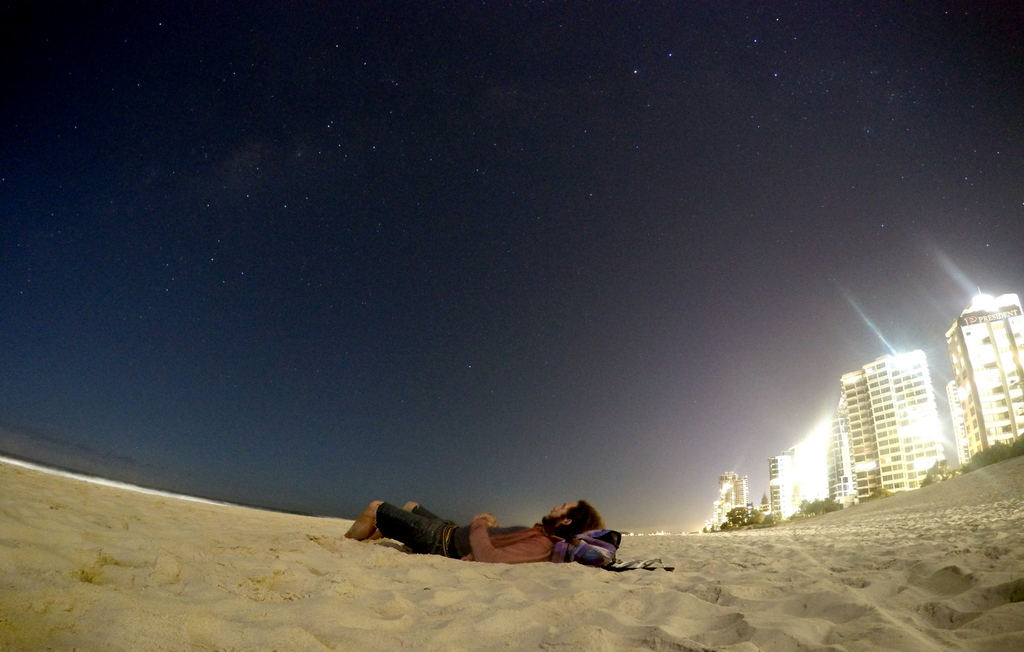

Thanks for reading!
Taran here, owner of Nomad'er How Far. I'm fond of psychedelic rock, photography & videography, anything to do with space and I'm also partial to the odd gaming session. Oh and I love to travel :P Get to know me here!
Be social and come follow me across the virtual world!
WANT MORE?
Taran & Makoto here, together we form Nomader How Far photography.

Check out my photo journals